Tuesday, November 13, 2012

Spatial Awareness Game-Home and School


We set up a game in the classroom for the children to play in pairs in order to foster their spatial awareness and use of their words in their vocabulary.  

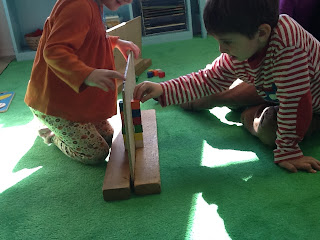
We put big, flat boards held up vertically by support blocks on the rug with a tray of colored wooden blocks.  There are two of each color block.  


 One child gives the directions while the other child follows them.


 There are eight blocks for each set.


 One child tells the other child where to put each block.
"Put the white block down.""Put the yellow block on top of the white block."
"Put the green block on top of the yellow block"...


When they are finished, they lift the partition and see how similar the buildings look.  


This pair learned the hard way, that maybe they should build a bit away from the screen.  But they didn't give up.  They moved on to the other child giving directions.  


We did this in small groups and then the materials were left out for children to use on their own.  The pictures above were taken on the day that they could use these items as a choice and it was very popular. 

This would be a fun game to play with your child at home as well.  You can always use the top of a board game propped up as a partition.  If you do not have blocks handy, you can use buttons or bottle caps or any small toys of which have two each. When it is your turn to give directions use spatial terms such as behind, in front of, next to, on top of, under, on the left, on the right, and so on.  
Have fun playing!

Monday, November 12, 2012

A Multi-sensory Experience: Clean Mud


Clean mud is a mulit-step multi-sensory experience that everyone must try!

Take about 6 bars of white soap.  We started with Ivory and switched to Dove.  Grate the soap with cheese graters until it is in very small pieces.  We used the large side of the graters.  We grate it right into our sensory table.  

We have graters that are designated just for soap and crayons at our school.  As these are sharp, we have the children wear a glove on the hand holding the soap to avoid any nicks with the grater.
This took a couple of days with different children taking turns grating.  Some loved it and grated every day, others took one turn and were done...and some avoided this part. 

The soap smell becomes very strong during this part, so if that might bother some of your students, you can choose a soap with less scent.     


Once the soap has been grated all up, we move on to the toilet paper.  We ripped up about four rolls of toilet paper into teeny tiny pieces and added that to the soap. We hung ours from a rod above the sensory table to allow the children independent access to the toilet paper as they were ripping it.  This part took another couple of days.
You then have a fluffy, powdery, clean smelling
bunch of stuff in your sensory table.  Make sure the children take a look at it at this point for comparison later.


Then we added warm water a little at a time and watched what happened.

The fluffiness went down as more water was added.

As we mixed it up with our hands we could feel it changing. The dryness became moist, the fluffiness became smooth and sticky.

We added about 6 small pitchers of warm water, but this is purely preference and trial and error.  There is no "wrong" way to do it...after all, its the process that counts.
We noticed that a full sensory table full of material disappeared leaving what seemed like a small amount of stuff behind.

Until we started playing with it...
and it got fluffier....
and fluffier...
and fluffier once again.


It feels really good on your hands, especially that first day when it is warm. The children are using their senses of touch, sight and smell together with this experience. 


Yep! That good!


We used it for another day after that and now we will play with what we saved in our outdoor mud kitchen.
Give it a try!

Sunday, November 11, 2012

Creativity and Cove Molding


I know I am several posts behind on our Pasta study and how that is progressing, but I wanted to share with you the creativity, problem solving and scientific inquiry that has been happening in our block area.

We placed some cut up pieces of cove molding in the block area along with some large and small marbles and a few small boxes with holes cut into them.


We lay them out in a welcoming provocation and see how the children will explore them....


 They found ways to roll the marbles from one box to the other using the molding.


They found how to angle the molding to allow the marbles to roll to the floor.


They connected the molding and made long pathways that spanned the carpet and usually went under our tables.  This caused some of them to invent ways to stop the marbles using boxes and other blocks off the shelves.  


They experimented using other surfaces in the center for their ramp ideas.


They "measured" using the marbles and created ways to contain ALL of the marbles.  One is never, never enough.


 Problems had to be figured out and solved.  The boy pictured above couldn't get his marble to roll from one box to the next.  The bottom of the box was pushing up on the molding so the molding touched the edge of the hole blocking the marble.  After inspecting the situation for awhile, he flattened the box and lifted the molding to the next hole.  Out rolled the marble!!  I was sitting right near him and could easily have lifted the box to free the marble.  Instead, I said, "what do you think the problem is?"  "why isn't your marble coming out?"  "what can you do to solve your problem?" And then I waited.  I supported him by being near him, but I did not give him suggestions.   When he figured it out he was quite proud of himself and empowered despite his recent frustration. I also made sure not to finish with a "good job" for him, but rather, "wow, you looked at it and then you solved your problem!"  He already felt good because of what he figured out.  He didn't need me to tell him he did a good job, but I wanted to make sure he realized that he was the one who solved that problem and remember how giving it a try...worked.


Children worked together trying each other's ideas and offering suggestions.  


They also explored the properties of physics balancing the marbles using various techniques.


It was a very engaging center allowing for a great deal of creativity and many possibilities.  
Cove molding can be found at your local hardware store.  Our sections are two different lengths.
I usually hunt for my marbles at dollar stores.  

This week we are continuing with this discovery process by adding PVC pipes cut in half, paper towel rolls, flexible tubing cut in half and pool noodles of various lengths also cut in half.  We also added masking tape and have only the large marbles out.  Time for some problem solving and inventing!!

Have any other suggestions for our block center that would extend this play?  Please leave a comment and share your ideas.